Emisar D4V2/D4SV2: Lockout Mode with Voltage/Battery Level
This page refers to features of Anduril 1.
You may be looking for the Anduril 2 manual or Check if you're running Anduril 1 or 2.
When I’m actively using my D4V2 or D4SV2, I’ll keep the flashlight in Off, and the rest of the time I’ll have it in Lockout Mode.
I like to configure the Aux LEDs in Lockout Mode to show me the flashlight’s battery level color with Low brightness.
This serves multiple purposes:
- I can quickly see the status of the battery
- Low brightness Aux LEDs indicates to me that I’m in Lockout Mode
- I can find my flashlight in the dark
- It looks cool 😎
Battery status colors
When viewing the battery status with the voltage indicator color, we can quickly get an idea of what the state of the battery is by seeing what color the Aux LEDs are showing:
- 🔵 Blue: good charge (3.9V+)
- 🟢 Green: medium charge (3.5-3.9V)
- 🔴 Red: low battery (2.9-3.5V)
- ⚫️ No color: critical battery (0-2.9V)
For newer versions of Anduril, there are more gradients of colors.
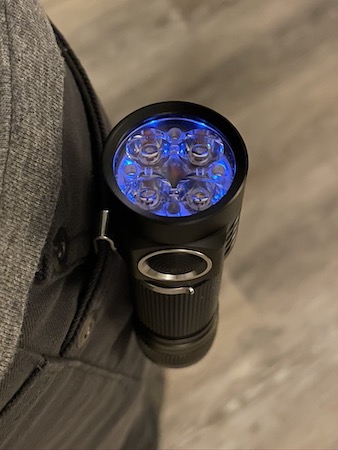 Blue means the battery’s still got a good amount of juice left
Configuring Lockout Mode Aux LEDs to Volts color
When in Lockout Mode, you set the Aux LEDs color to Volts:
-
3 Clicks and hold the last Click -
As you hold the button, notice the sequence of colors the Aux LEDs will cycle through:
Red
Yellow
Green
Cyan
Blue
Violet
White
Rainbow
Volts (this looks like a faster Rainbow buzz) -
When you’ve reached the Volts color, release the hold.
-
Awesome! You’ve set your Lockout Mode Aux LEDs to show you what your battery level is! 🔦
Configuring Lockout Mode Aux LEDs to Low brightness
The Aux LEDs have four brightness options in the following order:
Off
Low
High
Blinking
To progress to Low brightness while still in Lockout Mode:
3 Clicks . With each 3 Clicks, see which brightness you’re at, and keep going until you’re at Low brightness.
Lockout Mode setup complete
Now you can tell easily when you’re in Lockout Mode, see your battery level, and impress your spouse with all that clicking you’re doing with your fancy lightsaber flashlight. There’s plenty more you can configure with the Emisar D4V2 and D4SV2, but this is a great foundation to help get you navigating around the UI in a practical way.